May all who enter as GUESTS, leave as FRIENDS!
Showing posts with label Halloween 2009 Decorations. Show all posts

Monday, January 18, 2010

I've caught the BUG!!!

I have caught the bug that is going around lately. That is cleaning, organizing and decluttering! I spent this weekend finally getting ALL of the Christmas down and out of the front room. . . finally!
I wanted to get all of my Holiday decor organized and put away in a neat and orderly fashion.
Lucky for me, Target was having a FABULOUS sale on their storage bins. So I went and bought a few at five dollars a piece.

AS far as the bins go....
GO CLEAR!
Then you can see into the bin and have a general idea what is in each bin. That way next year you don't have to rifle through all of them looking for that one thing you need.
I went into word and made some Big labels for each of the Bins.
 
I used clear mailing tape. Place the label on the tape and then onto the bin. Much easier this way.
Cover the whole paper label with tape. This will help it withstand water and will not tear.

Affix the label in the middle of the bin. It looks so nice! I put one on each side of the bin and if I had enough labels, I put one on the lid as well.

Here are just a few of my Storage bins. The christmas Tree bin I inherited this year.
It is packed full with more boxes and the tree, of course.

One More Tip.... Organize and pack your boxes according to Rooms. That way you can pull the boxes out by room and pack and unpack without all the runaround!
This makes Holiday Decorating SOOOO much Easier! I promise! Saves so much time. Plus you have a place to store the everyday things that you take down for the holidays until you want to put them up again.
I am participating and joining....

I love Parties

Monday, October 19, 2009

The Decorations...

Well, The big event came and went! I hurried to snap a few photos of the decorations before the guests arrived. I am not sure where I was in all of the preparations at the point I took these pictures, but I hope you love the look/mood I hoped to create! I think one of my favorite things about the room is this....

No not me, Look closer... The Fence! Gives a creepy outdoor, cemetary vibe. The best part. Totally Free. My neighbors had this on the side of their house. They had it up and functioning at one point, but took it apart and down. So while it was sitting there I snagged it up and used it as my Halloween decor. It really brought it all together. LOVE IT! Too Bad I have to give it back and cannot use it year after year. *Sniffle Sniffle* That is me all decked out as "Dame Allison Bigh" for the party! I look like a vixen... ahhaahaha
Anyway...
Here is a look at the "treat" table... so much fun!
I didn't get a picture of the cauldron bubbling with the root beer/dry ice... and for good reason. I didn't realize that the second you add the dry ice it is going to bubble and practically explode all over the place... Of course right before the guests are about to arrive. hahaha oh man! But I got it cleaned up just fine! Do you remember this frugal find I posted about this summer? I was going to make my own "cupcake stand" for the caramel apples to sit on and then I saw the little tree thing and made my own Caramel Apple tree. It is silver and black and went perfectly with the rest of the decor. My skull cupcakes did not turn out as cutesy as I was hoping, but They tasted yummy!
The FAMILY Portrait Wall... I added a silhouette of me and my puppy Kapri.

The Table...

Mercury Star Ornaments hung from the ceiling with care!

Each person had a personalized Tombstone at their seat. I made these out of foam and spraypaint. Totally free. I got the foam scraps from work. (We use the foam to ship glass.) I just carved, painted, and affixed each name in vinyl. You can see Alex's better in the picture Below. I let each of them take their tombstones home.

The plates I got from... you guessed it, the Dollar Store. I made the placemats out of paper and spray glitter. IT really helped the plates pop off the table. Got the idea from Eddie Ross.

The fireplace... oh sweetness. It looks so warm and inviting! I love how it all turned out.

The rest are just little things that I added here and there to give it a ooky, spooky touch! ENjOY!

Every witch must have her broom and black cat! Love the framed silhouette to sit beside it.

I made the spell book from a Family Medical book. It was chock full of creepy body part pictures. I am going to jazz it up more before Halloween. I will post on that later.

Thursday, October 15, 2009

Here's your Sign...

So have I mentioned lately that I LOVE Vinyl? Well I do. A Lot. I love to sit down on the computer, type in a cutesy wootsy phrase and see it come to life on a craft or in a decoration! IT is so fast and so clean. I love that it looks professional and complete.
I have gone Vinyl crazy while learning Flexisign at work. Sooo much fun! Here are some of the signs I have made... and other places I have used Vinyl...
I love this sign, It is hanging over the food table/Buffet for my party. I added the googly eyes from the dollar store. I think it gives it personality

When I envision my basement for the party, I want it to look and feel like you are walking into a witch's home and seeing some of the things she would have around. So here is a sign I made on the flexisign program. I took an iceskate and cut and stretched and rearranged to make it look like a witch's shoe. Although NOW I wish I would have made a curvy point, but this will do. It was all originally painted on white vinyl, but I needed color so I hand painted it after it was adhered to the sign. I glued on some spiders and buttons and Voila... A very cute witch's foot!

This was a two second sign. spray paint board and put on Vinyl... Yeah!

Thank you Roeshel for the phrase... I thought it was adorable so I made a small one and stuck it on with this owl. Boy was that fun to peel... Love the ribbon!

Here is my big witch's cauldron that will hold the root beer and dry ice!

And then her little baby cauldron to match. I even put this same skull and crossbones on the plastic container holding the eating utensils

This was another easy spray, dry, peel, and stick. I used this black mesh that I have had for years to make the hanging part and cuten it up. I love cutesy!

I am even putting vinyl on pumpkins... I want to make a more sophisticated looking pumpkin. My next project!!! This was a quickie I put together this morning... HEY Frank A!

Here is my Branch tree that I have seen all over blog land. I added ting tings to mine to fill it and give it some whimsy! I like how it turned out. Sorry for the blurry pic.

All of the wood for the signs I got from work... they were the scrap pieces that were just lying around. My Boss decided it would be a good idea to let me use this...

Crazy I know, Me and a Hack saw... What was he thinking? hahaha I am very careful though. For sure, I do not want to lose any fingers and have to suffer through being called nubs the rest of my life. One day I was in the back of the shop chopping some long pieces down, and both Roger and Aaron about had a heart attack. They came running worried that one of Wyatt's kids had gotten a hold of the saw. No, it was just me. I cannot help though every time I use it to just laugh with glee like a little girl. It is really fun to use, I must admit. There is definately a certain sense of satisfaction in saying "Yeah, I know how to use a hack saw..." No big deal. I am pretty versatile though. That is how mY Mama raised me. We didn't always have a man around so we would have to just fix it ourselves. I know how to use a hammer and power tools. I am glad I am so independant. That is one of my favorite things about myself. If there is a problem, I can usually come up with a solution. I can figure it out!
(Sidenote: if you look at the picture of the hack saw, there is a tube on it about to be chomped! THat is another big project I am working on. I will show it to you when I am done... Don't you love the suspense???) Mwah ha ha

Wednesday, October 14, 2009

Time to BE AFRAID!!! Mwah hah ha!


Every good witch might be "Wicked" but she must still know what time it is... I made this clock the other day and thought I would share. I just took an old clock I had from years ago. It quit working and I just didn't have the heart to throw it away. So I took it apart...
Mod Podged some Orange Tissue Paper onto the clock front. I love that you could see the Roman Numerals through the T.P.

I modpodged paper printed in these bat, owl and skull designs on, and then just went to town with puffy paint. The "BE AFRAID" Stickers were from the Target Dollar Bins.

I love it.

I used these Skulls on my party invitations as well. I am also making cupcakes to match this skull for the party... So Excited. Two Days!

I will be posting pics of the final party presentation! YOu will love it! I cannot wait to share with you what I have done!

I Love Vinyl!!!

I love Vinyl... One of the latest projects (I have many) are these books! I got the idea from my friend Amber Hardle, who saw it on Studio Five I couldn't find the craft on the site where they actually did the books, but it is on there! Studio Five is a local program in Utah where they talk about everything from scrapbooking, to makeup, to health issues, and current events. I really enjoyed the show when I lived in Utah.
Anywho... I digressed. I will show you what I made, it was so easy and anyone can duplicate these. Even if you do not have a vinyl cutter, use word and print it out in the format you want and paint it on. It takes more time but is definately worth it. The end result is just too cute!

First I got three old books that were dusty and probably hadn't been read, well ever... haha and I just spraypainted them black, and silver. Again that same can of Rustoleum. I sprayed them standing up in a teepee style so as to get all the binding and not have to wait for one side to dry, before painting the other.
After they thoroughly dried I just peeled and stuck the vinyl on.

You can come up with any crazy, ridiculous, spooky titles that you want. I am going to make some for christmas time as well. I will be making a big one that will be the Naughty/ Nice List... Watch for that one.

This is a really fast sign I made. Just printed it off on the vinyl cutter, painted a board black and stuck the vinyl on... 1...2...3... EASY! It says "RADIATION" Sorry bad picture!


The reason I made the Author of "Secret Recipes" Velma Vandam is that I love the movie The New Misadventures of Icabod Crane I have watched this movie almost every Halloween since I was born. It is a tradition for me and I just love it! Velma Vandam is the Witch who turns herself into the Headless Horseman so she can rob the townspeople of their gold. It is totally cheesy, but I LOVE it! Hence, why she is the author of my book and the resident witch in my basement!
I featured this project on
The DIY Show Off

Thursday, October 8, 2009

Halloween Block letters... Black and Glitter... Love it

So, I told you about the chandelier search and making them into candelabras. The helpful man also gave me a box of 2 X 4's that I teased you with. Now for the Reveal!!! So much FUn!
I love that they were cut, raw, and pretty beat up. It just adds to the whole Creepy feel and look of things.
* * * BEFORE * * *

I took The wood, cleaned it up and painted half with the Black Valspar Semi Gloss Paint I used for my table project! I will show you that in a couple days. I then sprayed the other blocks with the Rustoleum Metallic Silver Spray Paint I got for this project.
Let them dry.
I thankfully work at a Glass shop and have the Elatable JOY of having a Professional Vinyl Cutter right there at work. So during slow lulls in the work day, I get to play around and make my own custom Vinyl Lettering. You will see plenty of it around here... Don't worry! I printed out the letters on the machine! All in White.
If you look closely though, the letters on the silver blocks are black... So to remedy printing off white letters and it not "popping" off the Silver backdrop, I just peeled all the excess off from around the letters and painted them with Acrylic paint. I let it dry thoroughly and then peeled off the letters and put on the block. The acrylic paint I had was very matte so I put the spray glitter on for three purposes. #1 Glitter is just Beautiful and adds so much! Love THe Sparkles! #2 It made the acrylic paint glossy looking #3 It served to really seal the Acrylic paint onto the vinyl lettering ensuring that it will stay on for years to come!
* * * AFTER * * *

Please excuse the glare... The shininess is beautiful but is hard to photograph, especially in a dark basement! THat silver IS Really shiny! Loves Loves IT!

The Glittery skull sitting on top the O is a Dollar store find... Looks cute there!

* * * Bonus * * *
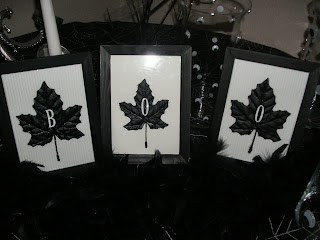
I also gave this teaser a while back... fall leaves spray painted black... loverly!

I took the black leaves, Made the BOO letters out of Vinyl and put onto the leaves.
Dollar store frames... gotta love them, Combined with this really cool corrugated paper as the backdrop and voila... a wonderful masterpiece. I really like how these turned out. really simple but oh so CHIc!

You have to click on the picture to really see and appreciate what these look like! I really like this project a lot! The best part is that it was all VERY inexpensive. The Frames cost all of $3.00.
Happy Halloween! More to come so check back!

Monday, October 5, 2009

Halloween, Oh how I love thee....


I am getting so excited! I have 11 days to put together everything I need for my Spooky Halloween Dinner and Murder Mystery Game! I completed the invitations finally and now I just need to assign the parts and give them out to people so they have time to put their costumes together! I am hosting a dinner for ten and then we will play a Murder Mystery Game! I am So excited! I grew up on the movie CLUE so this will be so much fun to actually get to be in my own twisted tale of Murder, Intrigue and Horror!!! Mwahh ha ha!
I have decked out my pad with all things spooky and now I cannot wait to play! I am going with glamorous witch theme. Like you are walking into the home of a Witch who loves pretty shiny things! My colors are Silver and Black! Love it!
THe Menu is still up in the air, but I will figure it out. I just hope to make something that all of my guests will enjoy! I am doing Root Beer in the Witches Cauldron with Dry ice... and I have a baby cauldron to match that has the same Jolly Roger Decal. OH How I love Halloween! I will post pics of the decorations and the table soon! Prepare to be AMAZED!

Monday, September 28, 2009

Halloween is coming, grab your candelabra...


So I have been absent from the blogging world, but I have been busy crafting and preparing for Halloween. I love LOVE LOVE Halloween and have been busy getting things ready for my Murder Mystery Dinner... I decided to do a Gothic Glam theme this year with Blacks and Silver. My first project was the Lighting... It has to be perfect. Eerie and set the mood for a creep-tackular but fun event!

I found these old hanging chandeliers at our local thrift store, Everything A-Z. Believe me they really do have everything. I asked for a chandelier and he went searching in the rafters and all over just to give me options. Very Nice! I love living in a little City with a small town feel! Love Farmington, Anyhow... they could have come with the glass bulbs as well but I was not interested in those. I was looking for something that I could turn into candelabras for cheap.

These originally hang and I took one look at them and knew they would be beautiful standing "upside down" as my spooky candelabras.

The detail is really beautiful. Very scrolly and swirly which I like. They are actually pretty heavy and I believe real brass. Very creep on their own, however they would not have matched my Silver Halloween dinner, so I had to change them.

I started by taking them completely apart. unscrewing and removing piece after piece. I removed all the wiring by snipping with wire cutters and pliers. All that remained were the brass pieces.

I cleaned the pieces really well with warm water and dish soap making sure to dry thoroughly and quickly. I hated to have to get rid of the dust and cobwebs as that is the desired look. you gotta love Halloween!!!

I then painted each piece with Silver Rustoleum Bright Coat Metallic Finish Spray Paint. This spray paint is really nice, it will pool up if you apply too much to begin with so do several coats. It also went a funny gray color if it was bumped while still wet, but you can spray over that and you can't even tell. This spray paint came in very handy for my other silver projects that I will share with you in the very near future.
I LOVE SPRAY PAINT!

The beautiful design of the top, I would love to just frame this piece and hang it, it would be beautiful art on the wall...

* * * * * BEFORE AND AFTER * * * * *

I then just hotglued the candles in the bowl of each arm. I used a lot of Hot glue to ensure that they would stay and also melted wax and just poured it into the bowl as well to make sure that they would not go anywhere! I dripped hot glue from the wick down the sides of the candles to make it look older and melty... A Very Cool effect that gave my excessive use of hot glue an excuse to be there.

The guy I got the chandeliers from even threw in a box of wood 2X4 scraps that he just gave me for free... Oh the possibilities...

Check back here soon to see what I did with these... super cute and super cheap!!

Featured this on
The DIY Show Off

LinkWithin

Related Posts with Thumbnails